How to Create an Automated Employee Exit Pass Form with Unique Tracking Numbers in Microsoft Word (LAN-Based Setup)
How to set up a LAN-based Exit Pass form with automatic tracking numbers using Microsoft Word templates (.dotm) — no API required.
🏢 Introduction
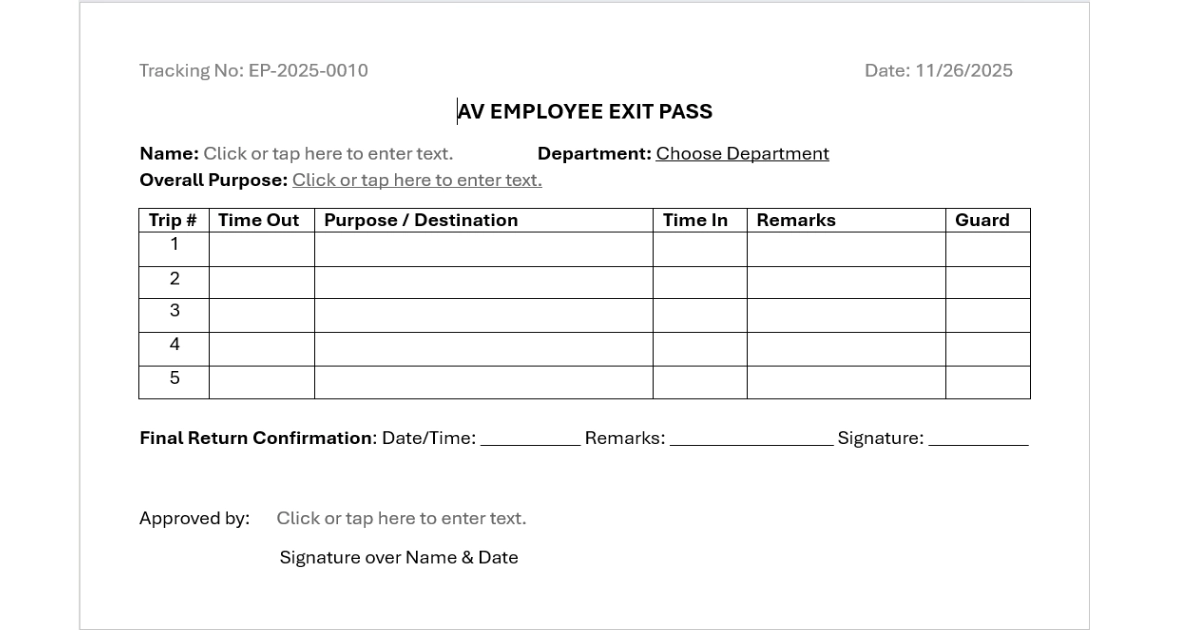
This guide explains how to create a shared, automated Exit Pass form using Microsoft Word’s template system (.dotm). The form automatically generates unique tracking numbers for each request.
The system works over a shared folder accessible to all employees in a local network (LAN). Each employee uses their own copy of the template file, but all share a single counter file that keeps the tracking number sequence in sync.
This setup is ideal for small to medium-sized organizations without a centralized database or ERP system.
How the System Works
- A shared folder on the network stores:
- The master Word template (
ExitPass.dotm) - A shared counter file (
counter.txt)
- The master Word template (
- Each user copies the template into their own Microsoft Word Templates folder.
- When a user creates a new Exit Pass, the template automatically:
- Reads the current number from the shared counter file.
- Increments it by one.
- Displays it in the form.
- Saves the new number back to the shared file.
- The employee fills in their name, department, and purpose.
- The form prints on half-letter-sized paper to save resources.
📁 Folder Setup
Shared Network Folder
Ask your system administrator to create a shared folder accessible to everyone:
1
\\10.10.0.3\Shared Files\ExitPass
Inside that folder:
1
2
3
ExitPass.dotm    ← Master template file
counter.txt      ← Shared tracking number file
README.txt       ← Notes or change log
Make sure all users have read and write access to this folder.
Copying the Template to User’s Local Template Folder
Each employee must copy the ExitPass.dotm file to their local Microsoft Templates folder.
- Press
Win+R - Type the following and press Enter:
1
%appdata%\Microsoft\Templates
- Copy the file
ExitPass.dotminto this folder. - You may also copy
counter.txthere if you are testing individually, but normally it stays in the shared folder.
Setting Up the Personal Templates Location in Word
If the Personal tab does not appear when creating a new document:
- Open Microsoft Word.
- Go to
File→Options→Save. - Under
Savedocuments, find the settingDefault personal templates location. - Enter this path:
1
%appdata%\Microsoft\Templates
- Click
OKand restart Word.
You should now see a Personal tab in the New Document screen showing ExitPass.
Enabling Macros
Since the file contains VBA (macros) to generate tracking numbers, users must enable macros.
- Open
ExitPass.dotm. - If you see a Security Warning: Macros have been disabled, click
Enable Content. - If macros remain blocked:
- Go to
File→Options→Trust Center→Trust Center Settings→Macro Settings. - Select
Disable all macros with notification. - Avoid
“Enable all macros”for security reasons.
- Go to
Adding a Trusted Location
Some users may get errors like:
“Remote location is not allowed by your current security settings.”
To fix this safely:
- Map the shared folder to a network drive (e.g. Z:).
1
Z: → \\10.10.0.3\Shared Files\ExitPass
- In Word, open
File→Options→Trust Center→Trust Center Settings→Trusted Locations. - Click
Add new location. - Browse to the mapped drive
Z:\ExitPass. - Check
“Subfolders of this location are also trusted.” - Click
OK.
If Word still blocks network paths, Microsoft 365 users must copy the .dotm file locally as described earlier, since cloud security often restricts direct execution from network drives.
🧩 Understanding the .dotm File
DOTM vs DOCX
| File Type | Description |
|---|---|
.docx | Standard Word document, no macros allowed. |
.dotx | Word template without macros. |
.dotm | Word template that supports macros (VBA). |
Opening and Using the Template
Opening Correctly
Do not double-click ExitPass.dotm to edit it. Instead, open Word and choose:
File→New→Personal- Select
ExitPass - A new document opens, usually named
Document1.docx - This document has a unique tracking number and can be printed or saved.
💾 VBA Macro Logic (Simplified)
The macro inside the template does the following:
- When a new document is created:
- Reads the last number from
counter.txtin the shared folder. - Increments it by 1.
- Displays the number in the form (e.g., EP-0001).
- Writes the new number back to
counter.txt.
- Reads the last number from
- Auto-fills:
- Current date
- Optional department drop-down
- Approver based on department
- Keeps some fields editable:
- Employee name
- Purpose
- Remarks
Pre-Filled and Editable Fields
- Date → Automatically fills with today’s date.
- Department → Drop-down list to choose from (e.g., Accounting, Operations, HR).
- Approver → Automatically updates based on department.
- Name, Purpose, and Signature → Editable text fields.
Paper Size Setup (Half-Letter)
To save paper:
- Go to
Layout→Size→More Paper Sizes. - Set the dimensions:
- Width:
8.5 inches - Height:
5.5 inches
- Width:
- Save this layout inside the template.
Word’s metric equivalent (for users in cm):
- Width:
21.59 cm - Height:
13.97 cm
Programming the Tracking Number Counter (VBA Steps)
- Press
Alt+F11to open the VBA editor. - Under
“ThisDocument”, paste your VBA code. - Use variables for:
- SharedPath =
"Z:\ExitPass\counter.txt" - TemplatePath =
Environ("AppData") & "\Microsoft\Templates\"
- SharedPath =
- Add error handling if the counter file is not found.
- Test with multiple users to ensure it increments sequentially.
Full VBA Source Code for the Exit Pass Template
This VBA script reads and updates the shared counter.txt file to generate a unique tracking number every time someone creates a new Exit Pass. It also automatically inserts the current date, and optionally fills department/approver fields.
How to Add the Code
- Open your
ExitPass.dotmfile. - Press
Alt+F11to open the VBA Editor. - In the Project Explorer, find your template:
1
2
3
Project (ExitPass.dotm)
└─ Microsoft Word Objects
     └─ ThisDocument
- Double-click
ThisDocument. - Paste the following VBA code into the editor.
- Save and close the editor.
VBA Source Code
1
2
3
4
5
6
7
8
9
10
11
12
13
14
15
16
17
18
19
20
21
22
23
24
25
26
27
28
29
30
31
32
33
34
35
36
37
38
39
40
41
42
43
44
45
46
47
48
49
50
51
52
53
54
55
56
57
58
59
60
61
62
63
64
65
66
67
68
69
70
71
72
73
74
75
76
77
78
79
' ===============================================================
' ExitPass.dotm - Auto Tracking Number Macro
' Version 1.0 - October 2025
' ===============================================================
' This macro automatically generates a unique tracking number for
' each new Exit Pass document using a shared counter file.
' It also fills in the current date and handles department logic.
' ===============================================================

Private Sub Document_New()
    ' Declare variables
    Dim counterFile As String
    Dim counterValue As Long
    Dim fileNum As Integer
    Dim trackingNo As String
    Dim sharedFolder As String
    Dim currentDate As String
    Dim dept As String
    Dim approver As String

    ' Path to shared folder (adjust if mapped differently)
    sharedFolder = "Z:\ExitPass\"  ' Example: mapped from \\10.10.0.3\Shared Files\ExitPass
    counterFile = sharedFolder & "counter.txt"

    ' Error handling
    On Error GoTo ErrorHandler

    ' Read counter value
    fileNum = FreeFile
    Open counterFile For Input As #fileNum
    Input #fileNum, counterValue
    Close #fileNum

    ' Increment the counter
    counterValue = counterValue + 1

    ' Save new counter value
    fileNum = FreeFile
    Open counterFile For Output As #fileNum
    Print #fileNum, counterValue
    Close #fileNum

    ' Format the tracking number (e.g., EP-0001)
    trackingNo = "EP-" & Format(counterValue, "0000")

    ' Insert values into bookmarks or form fields
    currentDate = Format(Date, "mmmm dd, yyyy")

    ' Example: assumes bookmarks named TrackingNo and DateFiled
    On Error Resume Next
    ActiveDocument.Bookmarks("TrackingNo").Range.Text = trackingNo
    ActiveDocument.Bookmarks("DateFiled").Range.Text = currentDate

    ' Optional: department drop-down logic
    ' Requires a content control named Department
    ' and a bookmark named Approver
    dept = ""
    approver = ""

    If ActiveDocument.ContentControls.Count > 0 Then
        dept = ActiveDocument.ContentControls(1).Range.Text
        Select Case LCase(dept)
            Case "accounting": approver = "Maria Santos"
            Case "operations": approver = "Juan Dela Cruz"
            Case "hr": approver = "Liza Reyes"
            Case "it": approver = "Mark Villanueva"
            Case Else: approver = "Department Head"
        End Select
        ActiveDocument.Bookmarks("Approver").Range.Text = approver
    End If

    ' Confirmation (optional, for testing)
    MsgBox "Tracking Number Generated: " & trackingNo, vbInformation, "Exit Pass"

    Exit Sub

ErrorHandler:
    MsgBox "Error generating tracking number. Please check counter.txt or permissions.", vbCritical, "Exit Pass Error"
End Sub
File and Bookmark Setup
Before this macro works properly, make sure your Word form includes:
| Element | Description | Example Name |
|---|---|---|
| Bookmark | Where tracking number appears | TrackingNo |
| Bookmark | Where current date appears | DateFiled |
| Bookmark | Department approver | Approver |
| Content Control | Drop-down for department | Department |
You can add bookmarks by:
- Highlighting the desired text location.
- Go to
Insert→Bookmark→ Name it (e.g., “TrackingNo”). - Click
Add.
How the Counter Works
- The macro opens
counter.txtin the shared folder. - Reads the last number inside (e.g., 25).
- Adds 1 → new number = 26.
- Writes it back to
counter.txt. - Displays “EP-2025-0026” on the form.
- The
counter.txtfile should initially contain:
1
0
Testing the Template
To test:
- Ensure counter.txt exists in the shared folder and is writable.
- Open Word →
File→New→Personal→ExitPass - Confirm a new tracking number appears each time.
- Print or save the form (optional as
.docx).
Optional Improvements
- Add a prefix per department (e.g., HR-0001, IT-0001).
- Add time-based resets (e.g., restart numbering monthly).
- Add a log file to record who generated each number.
- Add error-checking for concurrent file access.
Common Issues and Fixes
| Issue | Cause | Solution |
|---|---|---|
| Word shows “Security Risk” | File opened directly from a network | Copy to local Templates folder or add trusted location |
| Counter file not updating | No write permission to shared folder | Grant modify rights to all employees |
| “Remote location not allowed” | Network path blocked by Trust Center | Use mapped drive (Z:) or local copy |
| New document does not appear | User opened the .dotm directly | Must create via File → New → Personal |
| Personal tab missing | No default templates location set | Add %appdata%\Microsoft\Templates in settings |
| Tracking number resets | Using a different counter.txt per user | Ensure everyone uses the same shared counter file |
Version History
Version 1.0 – October 2025
- Initial release with auto tracking number.
- Shared counter file support.
- Half-letter page setup.
- Department and approver auto selection.
- Added trusted locations and macro security setup instructions.
Planned for Version 1.1
- Integration with ERP (CodeIgniter 4 or ExpressJR API).
- Online number generator for remote sites.
- Automatic saving to central database.
- Digital signature support.
Future Enhancements
- Web API Tracking Counter: To synchronize tracking numbers across sites.
- Online Submission Form: For remote employees outside the LAN.
- Version Control Log: Save generated passes in a database for auditing.
Summary
This setup provides an efficient, low-cost, and fully offline solution for managing Exit Pass requests. By combining Word’s template features with a simple VBA counter and shared network folder, organizations can maintain consistent tracking numbers and uniform document layout even without a database or ERP system.